1. The paper is not centered, there is a deviation around, adjust the position of the paper.
2. The label size is incorrect. Set the label size correctly.
1. The AC power socket plug and the power supply plug are not properly connected to the printer socket. Check the power connector and verify that the AC socket and power supply plug are properly connected to the printer.
2. The printer power switch is not turned on. Turn on the power switch.
▲ Note: In the following cases, the user can learn the label location so that the printer can better locate the label:
1. Use the printer for the first installation.
2. Use the printer for the first time after cleaning the sensor.
3. Re-use the printer if it has not been used for a long time.
4. Replace the paper roll with a new type.
5. In the printing process, the printer cannot effectively identify the mark.
Specific steps: When the printer is ready, long press the paper away button for 3S. When the status indicator blinks for 2 times, release the paper away button, and the printer begins to learn and move paper. When the printer is learning in continuous paper mode, learning is invalid.
Open the device and printer on the computer Settings page, select the printer properties interface of 1180CW, click Port, click Add Port, select Standard TCP/IP Port, click New Port, click Next, enter the printer IP address, click Next, and wait for the Port to be created successfully.
1.paper installed incorrect,Reinstalling supplies.
2.Improper printing concentration/speed setting.Use the Settings tool or software to readjust the print concentration and speed of the printer. Set the tool adjustment concentration to coarse adjustment, and the driver adjustment concentration to fine adjustment.
3.Print head/cots have dust or adhesive buildup.Clean the print head (refer to question 22 Clean the print head), 23 clean the print roller, 24 clean the sensor.
4.Print head is damaged.Use the setup tool to check for a broken head. If the print head is damaged, contact the customer service department of your purchasing manufacturer for repair.
1. Start label learning if no label learning is performed.
2. Seam marking detects the position deviation of the optocoupler component. Open the cover to check whether the seam mark detection component is offset. Black label paper: Move the seam mark detection component according to the black mark position so that the black mark can be detected by the detection light. Label paper/continuous paper: The detection of the optical coupler should be in the paper range.
Delete the unidentified Settings again, after shutdown, unplug the USB, and then restart the USB plug, it will automatically identify the machine, install a new driver
1. The communication cable is not correctly connected to the printer and the PC host. Reconnect the communication cable.
2. The communication interface is incorrectly configured.
3. The printer status is incorrect.Check whether the printer is in standby state by referring to the printer indicator information. The indicator is steady on.
Clean the paperless sensor when one of the following conditions occurs in the printer:
1. In the process of printing, the printer occasionally stops printing, resulting in an alarm of paper shortage.
2. Paper shortage does not call the police.
The steps to clean the sensor without paper are as follows:
1. Turn off the power supply of the printer, open the cover, if there is paper, remove the paper.
2. Use a soft cotton cloth dipped in absolute ethanol (should be wrung out) to wipe the dust and stains on the surface of the sensor.
3. After the absolute ethanol volatilizes completely, close the upper cover and try the machine again.
When the printer occurs in one of the following situations, the printing roller should be cleaned:
1. The printing is not clear.
2. A vertical column of the printed page is not clear.
3. Paper feeding noise is loud.
Printing cots cleaning steps are as follows:
1. Turn off the power supply of the printer and open the cover.
2. Use a soft cotton cloth dipped in neutral cleaning agent (should be wrung out) to wipe the dust and stains on the surface of the printing roller.
3. After the cleaning agent evaporates completely, close the top cover.
The printer head should be cleaned when one of the following conditions occurs:
1.the printing is not clear.
2.the vertical column of the printed page is not clear.
3.the paper feed noise is large.
Print head cleaning steps are as follows:
1. Turn off the power supply of the printer, open the top cover, and remove the paper if there is paper.
2. If you have just finished printing, wait for the printing head to cool completely.
3. Use a soft cotton cloth dipped in absolute ethanol (should be wrung out) to wipe the dust and stains on the surface of the print head.
4. After the absolute ethanol volatilizes completely, close the upper cover and try printing again.
After printing has paused, press.
During continuous printing, press.
In standby mode,Press.
Open the cover.Press 10 seconds
1. Ensure that the power supply is connected and the paper roll is correctly installed.
2. Ensure that the printer is powered off and the top cover is closed in place.
3. Hold down the paper button and press the power button to start the printer. Release the button after the printer starts.
Printer error, according to the sound of the error, count the number of alarm beep: such as didi, didi, the situation is as follows:
1.The indicator light flashes continuously for 2 times,buzzer alarm 2 sounds,indicating that printer mechanism error.
2.The indicator light flashes continuously for 3 times,buzzer alarm 3 sounds,indicating that paper shortage error.
3.The indicator light flashes continuously for 5 times,buzzer alarm 5 sounds,indicating that Overheating error.
4.The indicator light flashes continuously for 6 times,buzzer alarm 6 sounds,indicating that cover opening error.
5.The indicator light flashes continuously for 7 times,buzzer alarm 7 sounds,indicating that Seam label error.
1.green light shine.It indicates normal standby.
2.blue light flashing.It indicates RAM test error. Contact the nearest maintenance point.
3.pink light shine.It indicates printer head over heat.Wait for the printer to continue working automatically afer cooling
4.red light shine.It indicates the above cover is not covered. Check that the cover is completely covered.
5.red light flashing.It indicates no paper detected.Check to see if paper has been laid.
6.yellow light is always bright.It indicates low input voltage.Replace the power adapter.
7.white light shine.It indicates printer pause.Press the FEED button to print normally.
8.yellow light flashing.It indicates paper jam.Remove the jammed paper.
9.green light slow flashing.It indicates printer working.
If there are some spots on the label you printed, it is because there is dust in your printer and it needs to be cleaned promptly. It is recommended that you use special cleaning tools when cleaning, so that the printer can be well protected from damage.
1. Use industrial alcohol and cotton to clean the print head and roller and wipe off dust.
2. Check the roller, whether there is any trace of knife scraping, which causes unclear 360 degree fixed position when printing, and replace the roller.
3. Check whether the needle of the print head is broken at the fixed position. Replace the print head with a new one.
1. Check whether the paper passes through the sensor.
2. Observe whether the sensor part of the label is blocked by labels, dust, etc., and clean it with alcohol.
3. Check whether the label sizes of printer drivers and software items on the computer side are consistent with the actual Settings, including the spacing.
4. Measure paper on the printer again. If the printer fails, restore the factory defaults.
5. After a long time of printer, the electrical pressure of label sensor is weak, aging and other phenomena, it is recommended to replace it.
6. If it still doesn't work, find a new firmware version and refresh the printer to see if it works.
7. The transmittance of the bottom paper on the label is abnormal.
1. Use industrial alcohol and cotton to clean the print head and roller and wipe off dust.
2. Observe the corresponding position of the roller, see whether there is a knife scraping, and depression marks, replace the new roller.
1. The printing temperature is too high. Reduce the printing temperature.
2. The left and right pressure of the printer may be too high on one side. It is suggested to adjust it to a proper position.
3. The position of the front baffle of the printing head is loose or the difference between the left and right positions is too large, which leads to this situation.
4. The printing head part of the printer may be too skewed to the front of the roller on the left and backward on the right, resulting in wrinkles.
5. If the printing head is new, the printing head may not be installed properly. Reinstall the printing head.
1. Confirm whether the printing head button on the lighter side is pressed tightly, excluding artificial.
2. Clean the light part of the printing head and roller, there may be dust accumulation, and the removal is not complete.
3. The printing side is light, and the roller is seriously worn by naked eyes. It is suggested to replace the roller.
4. The printing side is light, and the printing head is seriously worn by naked eye. It is recommended to replace the printing head.
5. The pressure on both sides of the printing head is unbalanced, and the pressure on the lighter side of the bar code printer should be increased.
6. Adjust the front and rear positions of the printing head on the lighter side of the printer to the highest point on the horizontal plane where the printing head and roller are located.
1. Use industrial alcohol and cotton to clean the print head and roller and wipe off dust.
2. Increase the printing temperature and slow down the printing speed to see if it is ideal.
3. Adjust the overall pressure of the printer to see if it is solved.
4. The resolution of the bar code printer is too low. You are advised to replace the high resolution print head or bar code printer.
Determine whether the slot mark detects the position of the photocoupler correctly:
Small triangle alignment of optocoupler (for the infinite bit block version machine and the finite bit block machine with the upper optocoupler black light);
The optocoupler needs to be moved to the rightmost test (the version of the limited bit block on the right and the machine with white light on it). If it is not possible to confirm whether the optocoupler is a white light or a black light, the customer can align the small triangle and move to the rightmost two positions to do a paper study. After learning, it is OK to locate and move the paper normally.
The printer is loaded with paper and the top cover is covered. When the printer beeps twice and the indicator light turns blue, long press the "paper off" button for about 3 seconds, and release the "paper off" button. Then the printer will automatically move a section of paper for verification and learning.
1. Check whether the driver matches the printer model.
2. The driver test page is garbled, and TSC command information appears.
Cause: The program version is 1180CW, which is compatible with label and ticket modes. When the printer is in ticket mode, garbled characters will appear when printing label contents.
Solution: Restore factory Settings
1) When the printer is powered on, open the cover and hold down the paper button for 10S to restore factory Settings;
2) Restore factory Settings with tools.
1. Whether the paper is smooth and the limit plate is adjusted properly.
2. Phenomenon 1:
Single label paper, left and right or up and down deviation, drive adjustment non-printing area, default all 0.
Adjust the value of the non-print area as follows:
Left: input positive value, the overall print area is right-biased according to the input value; Right: input positive value, the overall print area is biased to the left according to the input value.
Up: input positive value, the overall printing area is biased according to the input value; Down: input a positive value, and the overall print area is biased up according to the input value.
3. Phenomenon two: up and down gradually offset, print more, more up or down.
Cause: paper gap identification problem
The solution:
A. Check whether the paper type read by the self-check page/tool is the same as the actual paper type. If not, change the paper type.
B. 1180CW adjustable small triangle.
C. The driver sets the paper specifications to the actual paper specifications.
Cause: the photocoupler can not sense the position of the paper, the paper specification set by the driver does not meet the actual paper.
The solution:
1) Adjustment of optocoupler position:
Black label paper
1. Adjust the optocoupler at the bottom of the paper to minimize interference.
2. Set the actual paper specifications for the driver, and the sensor type is black mark
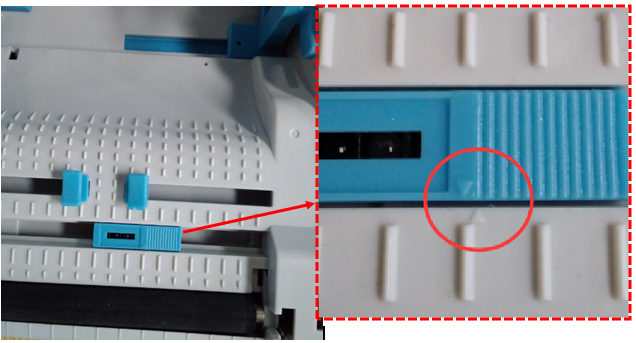
The label paper
1. Adjust the optocoupler according to the following figure, and pay attention to the "△" triangle position;
2. Actuation set actual paper specifications, sensor type is clearance.
Continuous feed
1. Adjust the optocoupler at the bottom of the paper to minimize interference.
2. The actual paper specification is set for the drive, and the inductor type is the paper set for the continuous drive
2)The paper specification set by the driver does not conform to the actual paper, set the paper specification:
A. Paper specifications: Right-click printer Driver - Printer Properties - Preferences - Paper specifications.
B. Sensor type: Preferences - Advanced Settings - Sensor type.
1. Check whether the driver is correctly installed and the printer model in use.
2. Check whether the driver is reinstalled and delete redundant drivers.
3. Check whether the port configuration is correct.
4. If the USB port is used:
A. If A computer is connected to multiple USB devices, the ports may contain multiple ports, such as USB001, USB002, USB003, etc. You need to select the correct ports to print properly. (You can also directly select the port RONGTA USB, no matter which USB port is connected to the computer can be used)
B. If all USB ports are not working, you can go to [Device Manager] -- [Universal Serial Bus Controller] to check whether "USB print support" is displayed. If not, the port is not identified.
Solution: Replace the computer USB port, replace the USB data cable.
5. If the serial port is used: The port may be occupied, causing printing failures. Release the occupied serial port before printing.
6. If a network port is used: The printer and router may not be in the same network segment. Ping the printer to check whether the communication is normal.
7. If the use of parallel port: need to select the correct parallel port, in [device manager] - [port] to check the computer parallel port is LTP several.